In this document:
- Introduction
- Advanced Twig Code Templates
- Show Different Content Depending on Language User Booked With
- Change Payment Received Format
- Specific Customer Information Fields
- Show Customer Information Only If Filled Out
- Custom Appointment Date Format
- Convert to Uppercase
- Grab the First Name Only
- Conditional Statements
- If statement
- Elseif statement
- Else statement
Introduction
The Notification Subject and Message fields use Twig Code Templates. These help you automatically add information from each appointment.
This guide will help you personalize your Notifications to make each customer feel like you wrote them especially for them. And, if you’d like to start with a base message, use our Default Notification Templates.
Visit our other guide for Basic Twig Templates that you can copy and paste.
Advanced Twig Code Templates
The following Twig Code Templates need to be tweaked; don’t copy and paste them into your notification subject and message until you’ve read the instructions to use them.
Show Different Content Depending on Language User Booked With
SSA stores the customer_locale at the time of booking, so IF the customer books on a page where it’s in a different language (or if the shortcode is embedded manually with the ssa_locale shortcode attribute), you can use that information to switch the notification content.
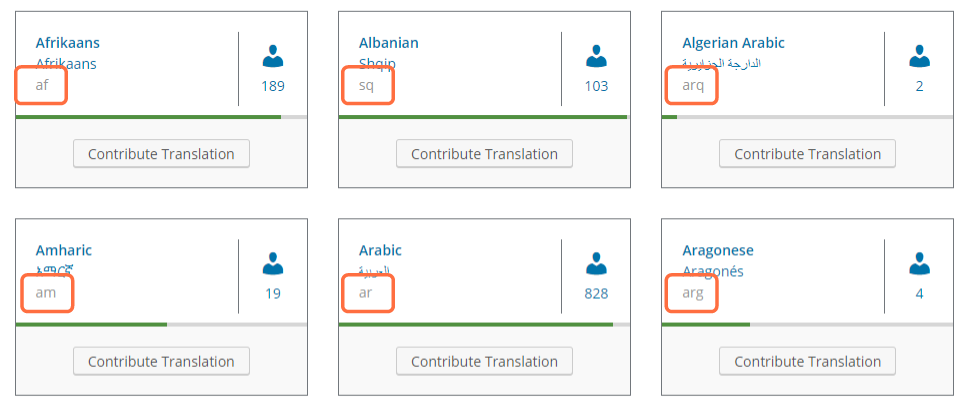
See the complete list of languages with their corresponding code here. In the image below, notice the language code highlighted in orange underneath each language description.
{% if Appointment.customer_locale == "REPLACE WITH LANGUAGE CODE" %}

Message for the alternate language.

{% else %}

My default message.

{% endif %}
Here is an example of the notification body with a Spanish/Mexico message:
{% if Appointment.customer_locale == "es_MX" %}
Hola {{ Appointment.customer_information.Name }},

Esta es una confirmación de la cita que acaba de reservar en {{ Global.site_url }}
Cita programada para {{ Appointment.start_date | date("F d, Y g:ia (T)", Appointment.customer_timezone) }}
Si necesita cancelar o modificar su cita, puede hacerlo visitando este enlace:  {{ Appointment.public_edit_url }}

¡Gracias!
Foxy

{% else %}
Hello {{ Appointment.customer_information.Name }},

This is a confirmation of the appointment you just booked on {{ Global.site_url }}
Appointment scheduled for {{ Appointment.start_date | date("F d, Y g:ia (T)", Appointment.customer_timezone) }}
If you need to cancel or change your appointment, you can do so by visiting this link:  {{ Appointment.public_edit_url }}

Thanks!
Foxy
{% endif %}
Change Payment Received Format
Customize how the currency is displayed in the Payment Received template; by default, it looks like this:
{{ Appointment.payment_received }}We’ll be adding the number_format( ) function to customize the decimal places.
By default, the number_format function on its own will return 0 decimal places.
{{ Appointment.payment_received | number_format }}To ensure your payments are consistently formatted to 2 decimal places, use the function like this.
{{ Appointment.payment_received | number_format(2) }}Specific Customer Information Fields
Display a specific customer information field using this Twig Code Template below:
{{ attribute( Appointment.customer_information, 'MYFIELD' ) }}Replace MYFIELD with the name of your customer information field.
Returning Values in Checkboxes
If your field is a checkbox, you’ll need to use a slightly different format. Since the checkbox field can hold more than one value (array), you’ll need to list all the possible values using the | join function.
Let’s say, for example, your checkbox has four possible values: one, two, three, and four. If someone selects all four values in the booking form, this is what the different join functions could output.
{{ attribute( Appointment.customer_information, 'MYFIELD' ) | join }}This join function without any parameters would output: onetwothreefour
There are no spaces between the values.
{{ attribute( Appointment.customer_information, 'MYFIELD' ) | join(', ') }} This join function with a single parameter would output: one, two, three, four
The single parameter lets the values be separated by the same [comma + space] every time. You can separate the values with any characters you want. For example, join(‘~ ‘) would output one ~ two ~ three ~ four.
{{ attribute( Appointment.customer_information, 'MYFIELD' ) | join(', ', ' and ') }} And this code snippet would output: one, two, three, and four
The first parameter tells the values to be separated by the [comma + space] for the first values except for the last one. The second parameter denotes the last separation of values, in this case, its [space + and + space].
This can also be whatever you’d like; for example, join(‘~ ‘, ‘ $ ‘) would output one ~ two ~ three $ four.
Show Customer Information Only If Filled Out
If statements are used to display Twig Code Templates only if the conditions are met.
For example, you might have an optional customer information field that you only want to show if the customer fills it out.
Use this Twig Code Template to show the field information only if the customer fills it out:
{% if attribute(Appointment.customer_information, 'MYFIELD') %}
MYFIELD: {{ attribute(Appointment.customer_information, 'MYFIELD') }}
{% endif %}
Replace MYFIELD with the name of your customer information field.
Custom Appointment Date Format
We can customize how the date is formatted for our Appointment Date and Time. This is done using the date( ) function.
For example, this is used to show us the Start Date and Time of our Appointment in the Admin Timezone:
{{ Appointment.start_date | date("d. F Y \\u\\m H:i (T)", Appointment.customer_timezone) }}In the Message, this will look like this: 31. October 2023 um 07:30 Uhr
That’s because the date( ) function of the Twig Code Template is formatting it: “d. F Y \\u\\m H:i (T)”
Furthermore, here’s a key to what each of these letters means below:
- F: The full name of the month (ex. January, February, March)
- M: The month, three letters (Jan-Dec)
- m: The month, number representation (1-12)
- d: Day of the month, leading zeroes (01 to 31)
- j: The day, no leading zeroes (1 – 31)
- D: The weekday, in three letters (Mon, Tue, Wed)
- Y: Year, in 4 digits
- y: Year, in 2 digits
- g: 12 hour time format, no leading zeroes
- G: 24 hour time format, no leading zeroes
- i: Minutes (00 to 59)
- a: (am or pm)
- T: Abbreviated time zone
- \\: Escape a letter, ex. \\u\\m comes out as “um”
So, instead, I wanted my date formatted like this: Mon Jul 1, 2020 14:30 CDT
I’d change it to “D M d, Y G:i T” from “F d, Y g:ia (T)”
And my new Twig Code Template would look like this:
{{ Appointment.start_date | date("D M d, Y G:i T", Appointment.customer_timezone) }}Make sure to use the correct timezone for the person receiving the message. Even if most of your customers are in your timezone, use the proper Twig Code Template to avoid confusion.
Admin Timezone
Start Date:
{{ Appointment.start_date | date("D M d, Y G:i T", Appointment.date_timezone) }}End Date:
{{ Appointment.end_date | date("D M d, Y G:i T", Appointment.date_timezone) }}Customer Timezone
Start Date:
{{ Appointment.start_date | date("D M d, Y G:i T", Appointment.customer_timezone) }}End Date:
{{ Appointment.end_date | date("D M d, Y G:i T", Appointment.customer_timezone) }}Convert to Uppercase
To convert any of the Twig Code Template outputs to uppercase, add the bit to the end of the statement: | upper
For example, if I wanted the customer name to be uppercase, I’d write:
{{ customer_name | upper }}Grab the First Name Only
To only display the first name from the Name field, use this instead of the {{customer_name}} template:
{{ (customer_name|split(' '))[0] }}Note: This cannot decipher between first names, prefixes, or double names. If someone writes their name as Mary Lou Jones, this will then grab only Mary. And if someone writes in Dr. Jones, this will then grab only Dr.
Conditional Statements
Twig offers if, elseif, and else statements. And supports logical conditions such as:
- Equals ==
- Not equals !=
- Less than <
- Less than or equal to <=
- Greater than >
- Greater than or equal to >=
And other cool conditions such as:
- is even
- is odd
- now
- not
- and
- or
And finally, here’s a key to the different letters that you can use with the date() function:
- F: The full name of the month (ex. January, February, March)
- M: The month, three letters (Jan-Dec)
- d: Day of the month, leading zeroes (01 to 31)
- j: The day, no leading zeroes (1 – 31)
- D: The weekday, in three letters (Mon, Tue, Wed)
- Y: Year, in 4 digits
- g: 12 hour time format, no leading zeroes
- G: 24 hour time format, no leading zeroes
- i: Minutes (00 to 59)
- a: (am or pm)
- T: Abbreviated time zone
If statement
This is an if statement; if A is true, then show B.
{% if A %}
B
{% endif %}
If examples
Example A: If the day this message goes out is a Monday, I then want to include the message, “Hello, it’s Monday!”.
{% if "now" | date('l') == "Monday" %}
Hello, it's Monday!
{% endif %}
Example B: If the appointment start date is on a Monday, I then want to include the message, “Your appointment is this coming Monday!”.
{% if Appointment.start_date | date("l", Appointment.customer_timezone) == "Monday" %}
Your appointment is this coming Monday!
{% endif %}
Elseif statement
If A is true, then show B. If C is true, then show D. If both A and C are false, show E.
You can add in as many stacked elseif statements as you want; but, just make sure not there’s no overlap between the statements!
{% if A %}
B
{% elseif C %}
D
{% else %}
E
{% endif %}
Elseif examples
Show messages depending on the hour an appointment starts on.
{% if Appointment.start_date | date("G", Appointment.customer_timezone) == 13 %}

This appointment is between 1 PM and 2 PM, but not 2 PM.

{% elseif Appointment.start_date | date("G", Appointment.customer_timezone) == 14 or Appointment.start_date | date("G", Appointment.customer_timezone) == 15 %}

This appointment is between 2 PM and 4 PM, but not 4 PM

{% else %}

This appointment is anytime not between 1 PM and 4 PM

{% endif %}
Else statement
If A is true, then show B. If A is false, then show C.
{% if A %}
B
{% else %}
C
{% endif %}
Else examples
Show message depending on whether the appointment starts at an even or odd hour.
{% if Appointment.start_date | date("G", Appointment.customer_timezone) is even %}
This appointment starts at an even hour.
{% else %}
This appointment starts at an odd hour.
{% endif %}