
In this document:
How to Use Appointment Types
An Appointment Type represents a booking calendar. The settings here outline your availability schedule and the rules for your booking calendar.
At the basic level, you’ll be able to set:
- When you’re available for that Appointment Type
- How and when your clients can book on your calendar
- What information you need to collect from clients for the appointment
But, depending on your integrations (Google Calendar sync, Mailchimp, Payments), you’ll see more tabs and options here.
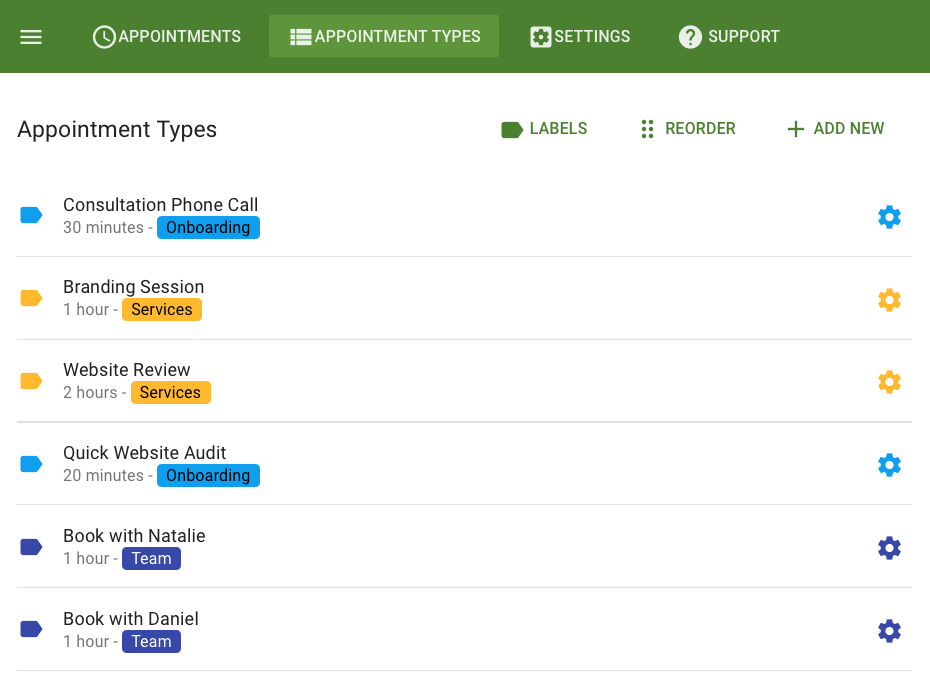
To get to these settings, go to Appointments > Appointment Types > Select one from the list or Add New.
Independent Availability
By default, all of your Appointment Types are dependent on each other. That means when someone books a time slot for one of your Appointment Types, all other Appointment Types block off that same time slot.
This is because the plugin assumes a single person is managing multiple service calendars, and they wouldn’t want double bookings between them.
If you need each Appointment Type to be independent and have its own schedule, turn on the Independent Availability option.
Basics
General information about this type of appointment.
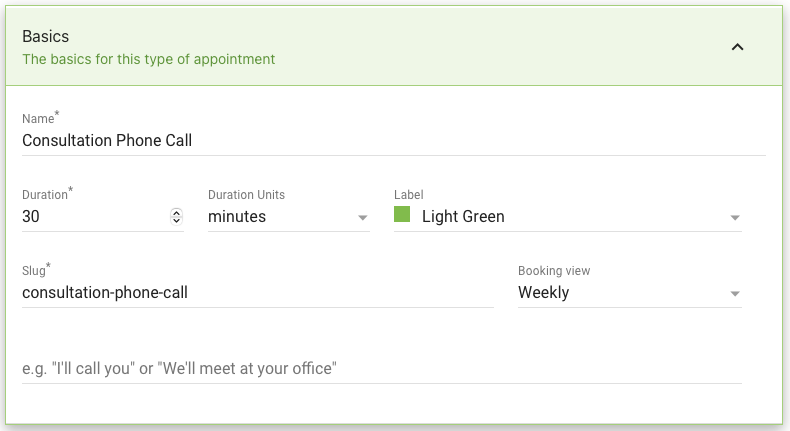
Name
The name of the Appointment Type is visible on each screen of the booking process. Make sure to make this descriptive so the customer knows what they’re signing up for.
Duration
The length of the Appointment Type. How long you expect this service or event to take.
Units can be set to minutes, hours, days, or weeks. The duration is then displayed to your customer during the booking process as well.
When adding buffers, the appointment type length becomes the duration + buffers. BUT! It’s not noticeable when booking; it’s only considered in the plugin’s availability calculations.
Label
The Label field is helpful for admins to color-coordinate their Appointment Types. Labels are associated with a color and a title. This is not displayed to your customer.
Learn more about using the Appointment Type Labels.
Slug
The slug is used to help with CSS changes and to specify shortcodes.
You won’t see the slug field when you’re first creating a new Appointment Type. The first save creates a slug for you based on the Name you chose. After that first save, you’ll be able to see and edit the slug field.
As a result, this is the Appointment Type’s unique identifier and is helpful to know when you’re making CSS edits.
Make sure you don’t use spaces or special characters other than the hyphen (-) when choosing a slug. This can cause unusual errors and behavior down the line.
Booking View
The Booking Calendar associated with the Appointment Type can show the available dates in either a monthly or weekly view.
Weekly View
The weekly view is best for when you expect customers to book the nearest date and time.
For example, a dog adoption center would want the new owners to book ASAP to pick up their new pet.
Depending on how much space your theme/page layout gives the booking calendar, it could show the dates horizontally or vertically.
Monthly View
The monthly view is best for when you expect customers to book dates further out from now.
For example, a busy wedding photographer has clients booking months in advance and needs people to easily navigate and get an overhead view of the overall availability.
The calendar is responsive to the size of the container; with more space, the calendar expands.
Instructions
This can be a brief memo about appointment information for your customer. The confirmation page and email notifications will also show this message by default.
For more detailed instructions, we recommend you include those in the notification message instead.
Availability
When are you available for this type of appointment?
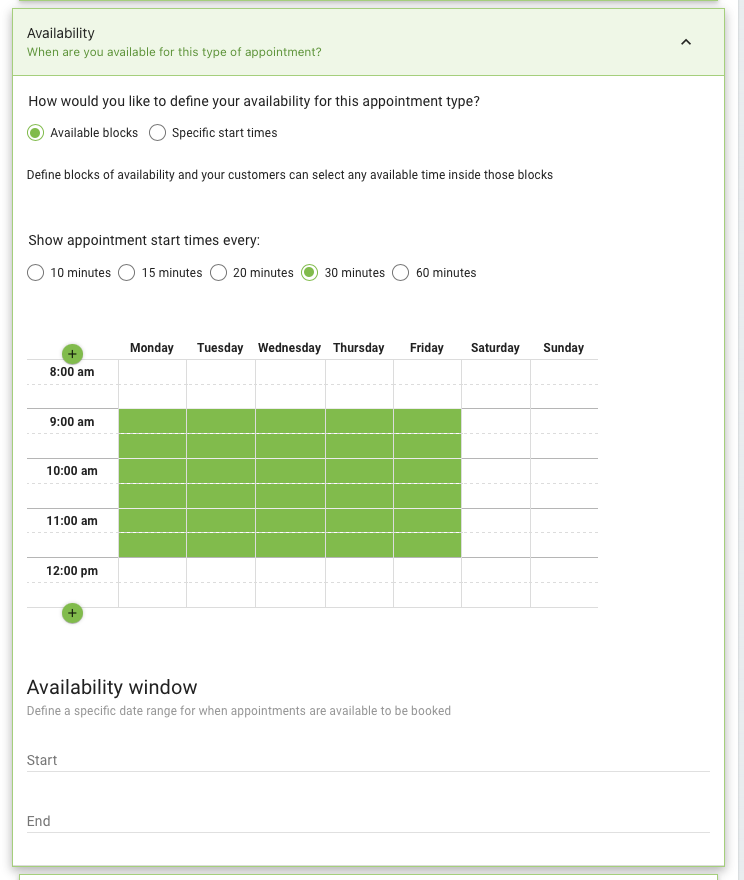
Time Slot Start Times
You have two options for choosing start times – Available Blocks and Specific Start Times.
Available Blocks
With this setting, your availability is determined by whether a booking can fit within the blocks of time you choose. This setting is best when you don’t have a specific preference for when you want bookings to start.
For example, if you’re at your office from 9 AM – 5 PM, and you don’t mind anyone stopping by between those times.
If you’re using Available Blocks, you can use the mouse to click and drag the pencil cursor on the white boxes to add new time slots. To remove time slots, use the eraser cursor to click and drag on existing time slots.
Specific Start Times
With this setting, you can choose the exact times you’d like bookings to start.
This setting is best for classes, tours, and all-day appointments.
Using the Specific Start Times option, you can use the times along the left column to highlight or erase an entire row.
Time Slot Intervals
Choose the starting time intervals for bookings. Appointments can start on a 10, 15, 20, 30, or 60-minute interval.
A smaller interval will give you more precision in choosing when appointments can start. It will also let you book more appointments if your duration is short.
For example, if you have a duration of 10 minutes for an appointment type, then the 10-minute interval setting would let you open up to 144 single-capacity time slots in a day. While the 60-minute intervals would only let you open up to 24 single capacity time slots in a day.
While you can create Appointment Types with less than a 10-minute duration, you cannot set the Time Slot Interval to less than 10 minutes. However, we do offer a workaround for this.
Availability Table
Use the availability table to mark the times or blocks you’re available for appointments each week.
The hours in the day expand with the + button at the top and bottom of the hours column.
By default, the table sets the availability from Monday-Friday 9 AM – 5 PM, with one hour from noon to 1 PM for lunch.
When choosing your availability, please take the duration + buffers into consideration. If the blocks or specific start times are not long or wide enough to contain the duration + buffers, then the time slots will not appear.
Please see this guide if you have missing time slots or see ‘There are no available appointments’.
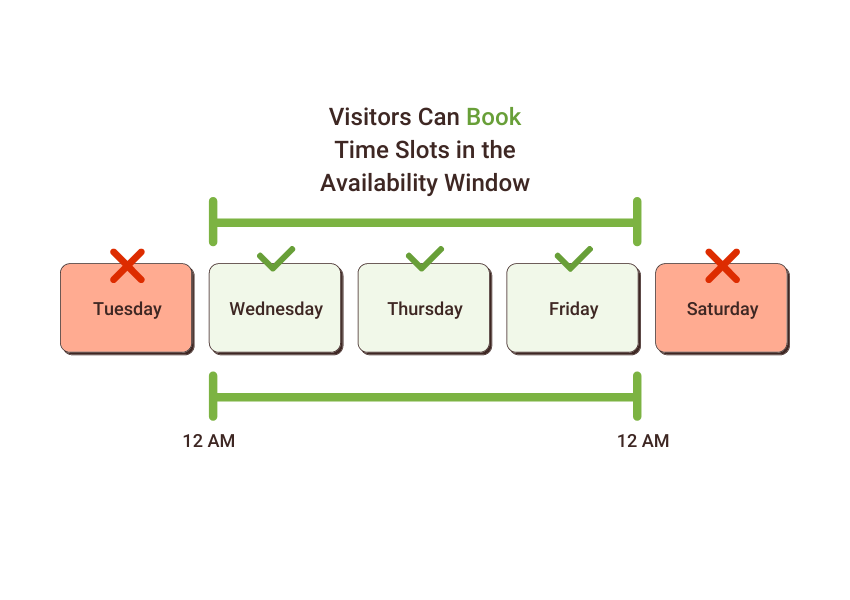
Availability Window
The availability window lets you choose a time range for when you’d like time slots to show. A customer looking at your Booking Calendar can only see time slots within these chosen dates.
If you don’t see this setting, then please visit the Advanced Scheduling Options guide to show you how to turn this setting on. And for more details on the Availability Window.
Team Members
Which team members can take appointments of this type?
Available in the Business Edition only.
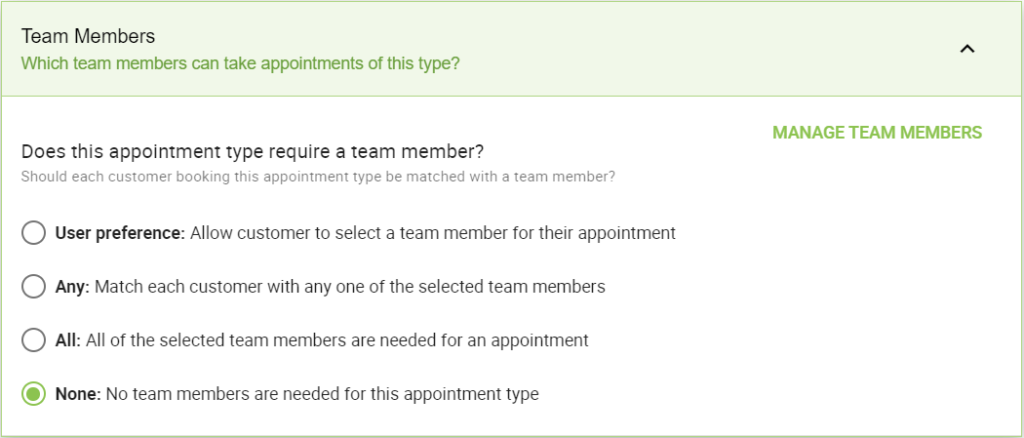
Team Member Requirement
Lets you choose whether you’d like team members to be required for this type of appointment. Also, you can choose how (User Preference, Any, or All) and which team members can be selected.
The Team member(s) must be available for a customer to be able to book a time slot.
Find out more about how this setting works in our Team Booking guide.
Capacity
How many customers can book at the same time?
Available in the Plus, Pro, and Business Editions.
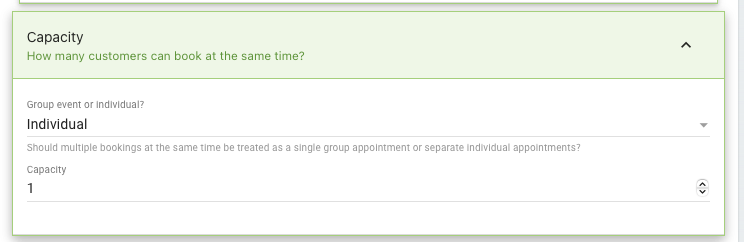
Capacity Type
The Capacity Type can either be Group or Individual. This just means how the bookings will be treated in the back-end and for the availability calculations.
- Individual bookings allow for overlapping bookings across different time slots.
- While Group bookings allow overlapping bookings only in the same time slot.
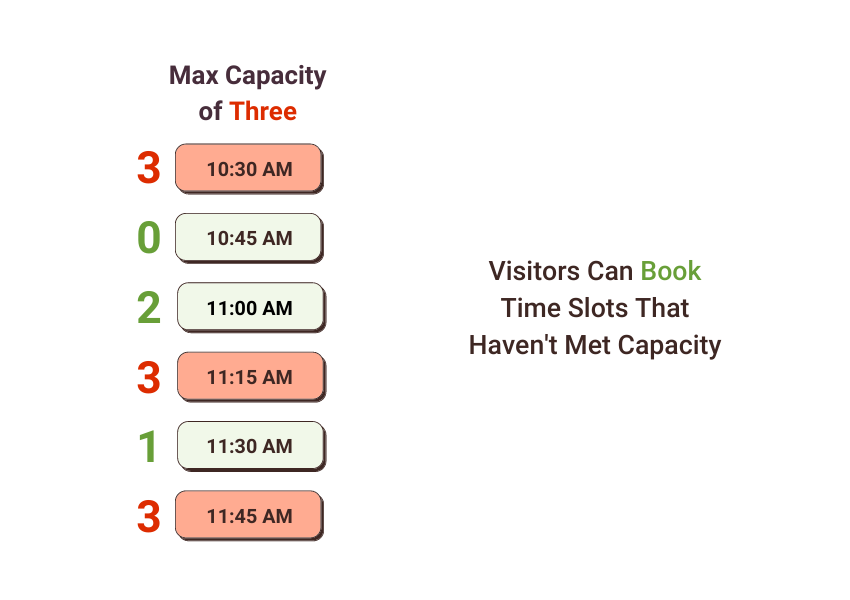
Capacity
This refers to the max amount of overlapping appointments you’d like to have for each time slot.
Find more information on how this setting works in our Capacity guide.
Scheduling Options
Rules about how and when people can schedule this type of appointment.
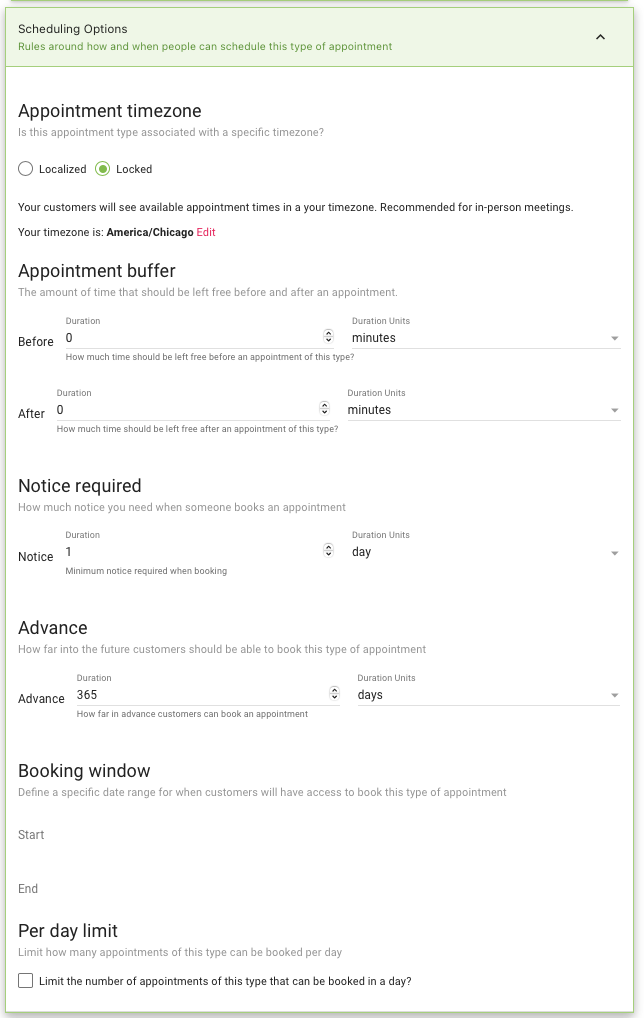
Appointment Timezone
Set the timezone associated with your booking calendar. This selection depends on whether your customers usually share a timezone with you (Locked). Or, if you tend to get customers from different places (Localized).
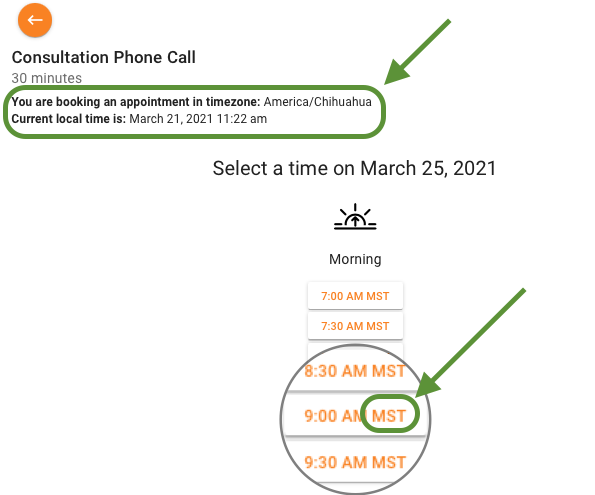
Localized
Localized lets your customers see time slots in their timezone. This is recommended for online meetings and people with long-distance customers.
Moreover, our plugin automatically detects the customer’s timezone using their IP address/Browser. But, if it’s incorrect, they can always edit it using the Pencil by the “Your timezone: …” field.
Locked
Locked lets your customers see time slots in your chosen timezone. This is recommended for in-person meetings and people with local customers.
If your customers are in the same timezone as you, they will not see any timezone-related messages or abbreviations within the booking calendar.
To change your local timezone, visit the SSA Settings tab > General Settings.
If your customers are in a different timezone than you, then they’ll see, “You are booking an appointment in timezone: …” and show them the local time for the booking calendar. Each time slot will also show the timezone abbreviation.
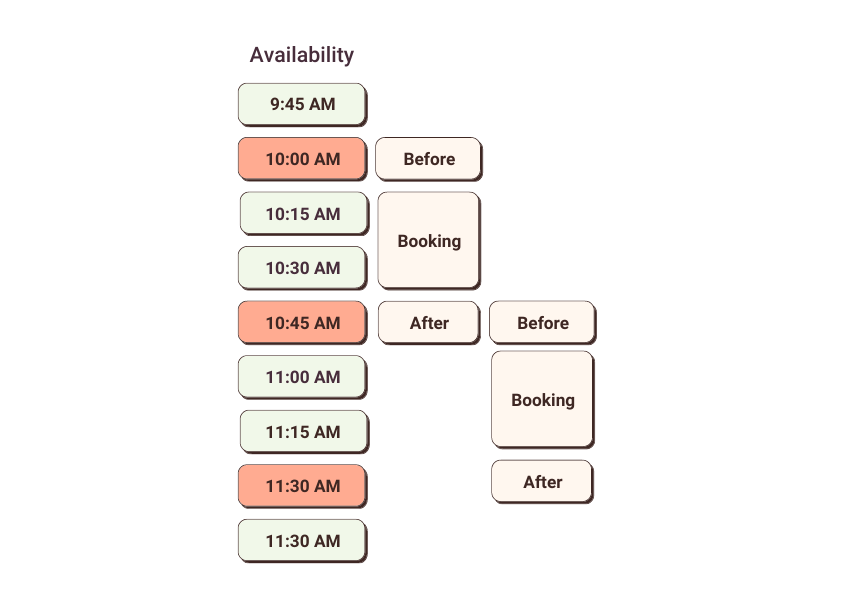
Appointment Buffers
The buffers allow you to space out your appointments to give yourself time between meetings. Appointment Buffers can be set:
- Before: Makes sure you have time to prepare for the appointment
- After: Give yourself time to wrap up or handle bookings that run over the scheduled end time
When two buffers overlap, only the larger of the two is used. For example, if your Before buffer is 15 minutes and your After buffer is 10, the buffer between these two bookings will end up being 15 minutes — not 25.
The buffers only help space out your bookings. The buffers don’t get included in the appointment duration and your customers won’t know they’re there.
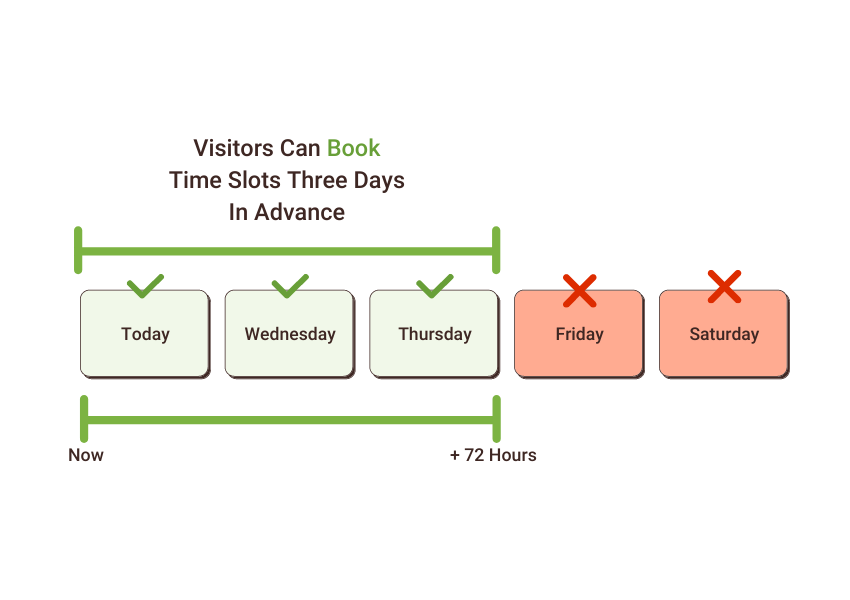
Notice Required
The amount of time you need to take note of new appointments. Use this feature to avoid customers booking at the last minute.
If you’re using the Notice Required setting, no one will be able to book any time slots between now and the time you’ve chosen.
For example, if you choose 3 days, then you won’t see bookable time slots within the next 72 hours.
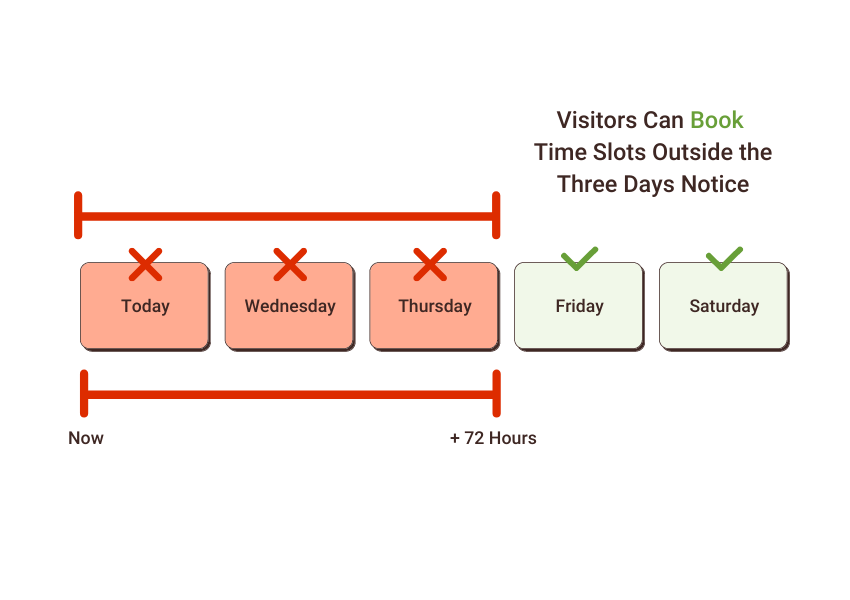
Advance
This limits how far into the future customers can book appointments. A customer looking at your Booking Calendar cannot see time slots beyond this chosen time.
For example, if you set this as 3 days, then customers won’t be able to see any bookable time slots beyond 72 hours in your booking calendar.
If you don’t see this setting, visit the Advanced Scheduling Options guide to show you how to turn this setting on. And for more details on the Advance setting.
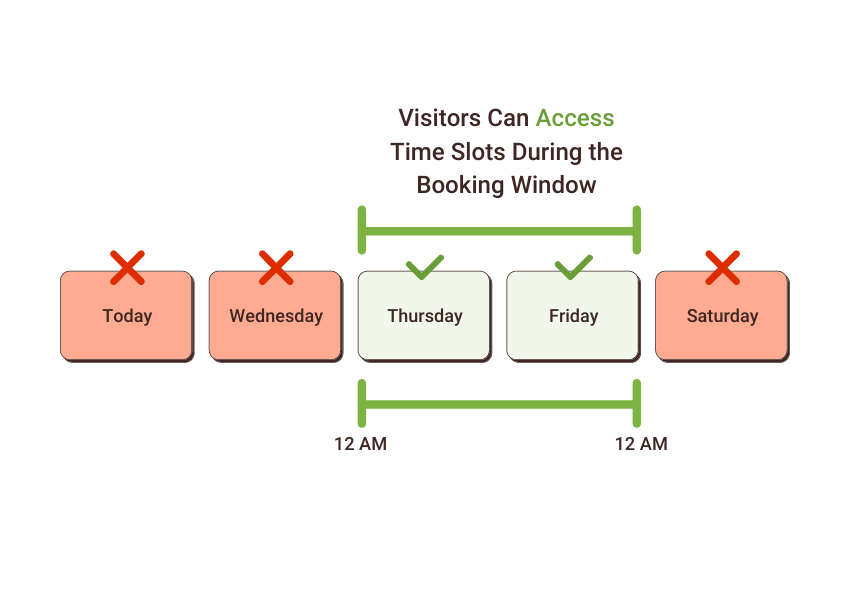
Booking Window
This limits when customers can access your calendar to book any time slot. This is useful when you’d like to set a period to open and close access to your booking calendar.
If you don’t see this setting, visit the Advanced Scheduling Options guide to show you how to turn this setting on. And for more details on the Booking Window.
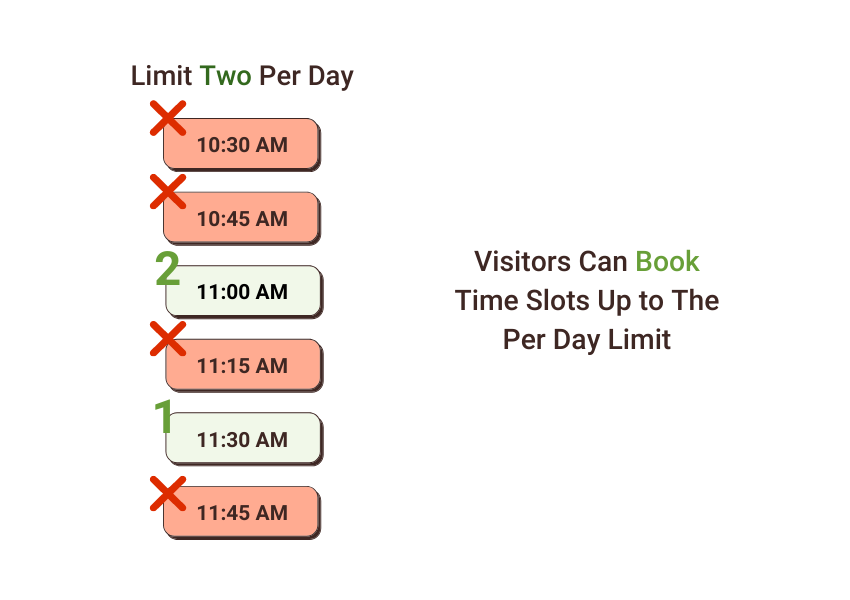
Per Day Limit
Choose the maximum amount of bookings you’d like to receive in a single day.
For example, if you set this to two, once you’ve received 2 bookings for a specific day, then the entire day is blocked off from receiving any more bookings.
Resources
Book Resources or equipment with each appointment.
Available in the Business Edition.
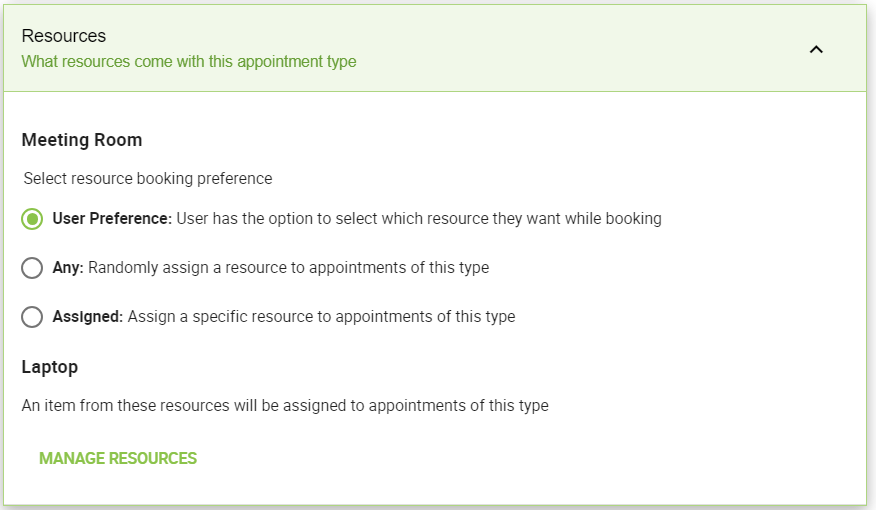
Resources Requirement
Lets you choose whether you’d like a Resource to be required for this type of appointment.
The Resource(s) must be available for a customer to be able to book a time slot.
Find more information on how this setting works in our Resources guide.
Payments
Take payments at the time of booking.
Available in the Pro and Business Editions.
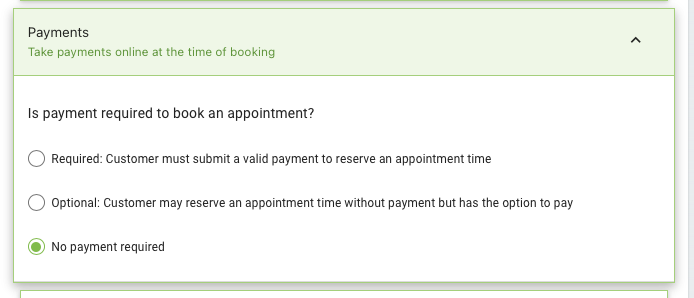
Payment Options
The appointment type can only have a single fixed price for each booking. Here you can enter your price and preferred currency type.
We also don’t automatically carry out refunds, so you’ll have to manually enforce them here with the Refund Policy field.
Here are some helpful guides to get you started on the Payments feature:
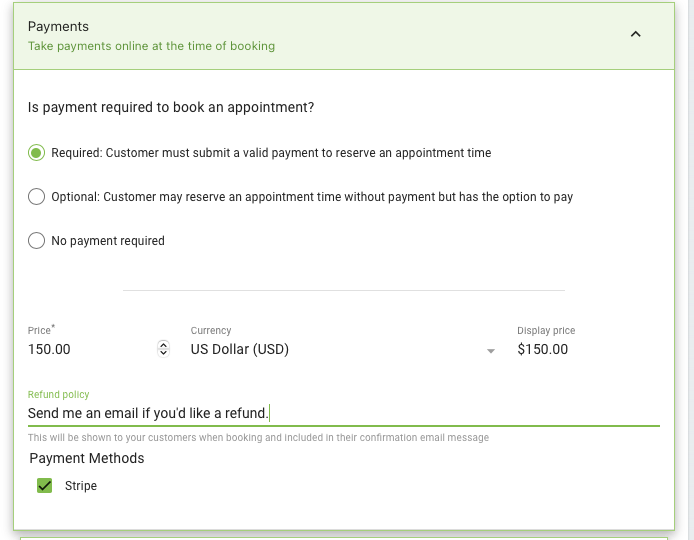
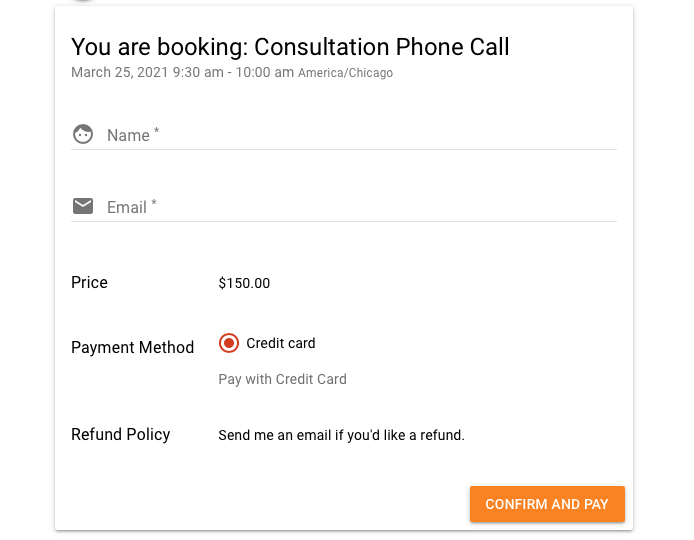
Required
With the Required setting, a customer must complete a payment method in order to make a booking.
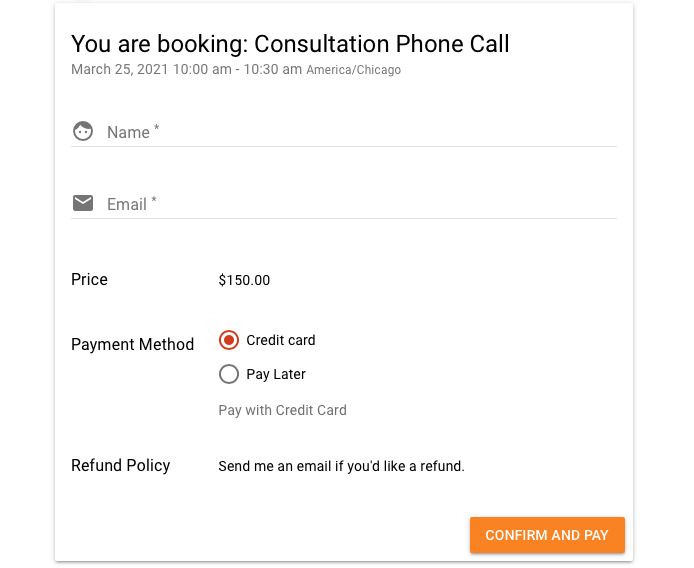
Optional
With the Optional setting, a customer has the choice to either complete the payment before booking or not. The customer does not need to pay to book an appointment; they can use the “Pay Later” option.
No Payment Required
In addition, with this option, this appointment type will have no payment fields included in the booking form.
Google Calendar
Available in the Plus, Pro, and Business Editions.
This tab lets you choose whether you’d like to sync this appointment type with your Google Calendars.
Visit the following guides to help you get started with Google Calendar sync:
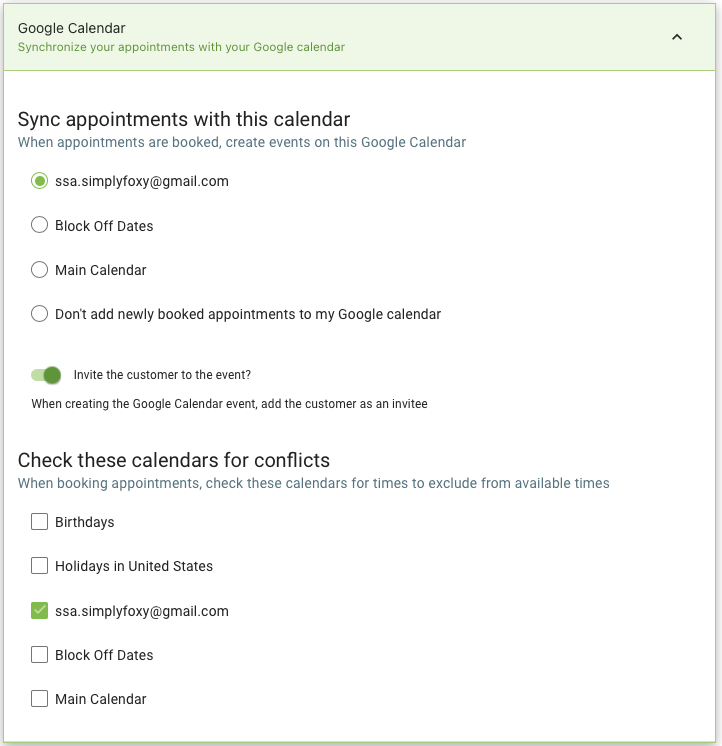
Sync Appointments
Under the Sync Appointments with this calendar heading, you’ll see a list of radio buttons. Whenever a new appointment is booked, SSA will create a new Google Event on the calendar that you choose here.
In addition, notice that the radio buttons mean you can only choose a single calendar to sync.
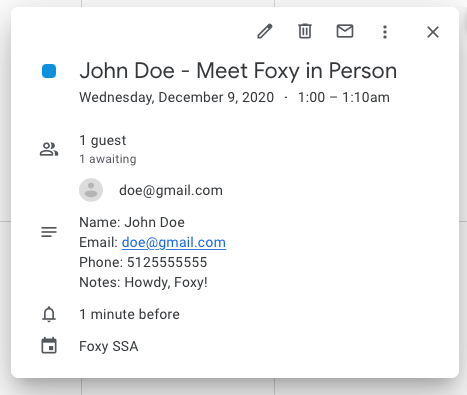
Google Invites
The Invite the customer to the event? toggle allows you to add team members and customers as attendees to your Google Event.
Check Calendar Conflicts
Under the Check these calendars for conflicts heading, you’ll see a list of checkboxes. SSA checks each of the selected Google Calendars here and removes booking availability if it finds any conflicts.
Additionally, notice that the checkboxes mean you can choose multiple calendars to check for conflicts.
Web Meetings
Tie either a static or a dynamic web meeting link to this appointment type.
Visit this guide for more information on the Web Meetings features.
Custom Meeting URL
With the Custom Meeting URL option, you can enter a static/fixed meeting link. For example, Zoom provides a personal meeting room link for each account; this would be an excellent place to add it.
Whatever you enter here will be used in the Google Events that SSA creates when you’re using Google Sync.
Additionally, this can also be added automatically to notifications when you use the Twig template code.
Google Meet
Available in the Plus, Pro, and Business Editions.
With the Google Meet option, you can generate a unique meeting link for each appointment booked.
Similar to the Custom Meeting URL, this link is also attached to the Google Events that SSA creates. And you can also attach it to the SSA notifications.
Zoom
Available in the Plus, Pro, and Business Editions.
With the Zoom option, you can generate a unique meeting link for each appointment booked. Zoom also gives you the option of making your meeting room into a:
- Private Meeting: Host required to admin each meeting attendee
- Or, an Open Meeting: Anyone with the link can immediately join
Similar to the Custom Meeting URL, this link is also attached to the Google Events that SSA creates. And you can also attach it to the SSA notifications.
Webex
Available in the Plus, Pro, and Business Editions.
With the Webex option, you can generate a unique meeting link for each appointment booked. Webex also gives you the option of making your meeting room into a:
- Private Meeting: Host required to admin each meeting attendee
- Or, an Open Meeting: Anyone with the link can immediately join
Similar to the Custom Meeting URL, this link is also attached to the Google Events that SSA creates. And you can also attach it to the SSA notifications.
Team Member’s Web Meeting URL
Available in the Business Editions only.
With the Team Member’s Web Meeting URL option, you can make sure the customer receives the correct Team Member web meeting URL with this option.
Similar to the Custom Meeting URL, this link is also attached to the Google Events that SSA creates. And you can also attach it to the SSA notifications.
Google Meet and Zoom are currently incompatible with the Team Booking feature. If you decide to use these third-party services along with Team booking, only one virtual meeting can be conducted at a time.
Visit this guide for more information on the Team member’s Web Meeting URL.
MailChimp
Allow your customers to subscribe to your MailChimp list when booking an appointment.
Available in the Plus, Pro, and Business Editions.
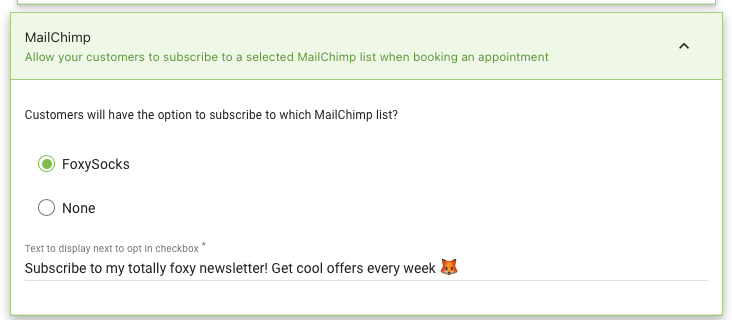
Choose the list where you’d like to add new subscribers. Customers will see an opt-in checkbox in the booking form when this setting is enabled.
Visit the following guides for help with the MailChimp settings:
Webhooks
Integrate SSA with your custom apps, or use Zapier and Make to make the connections!
Available in the Pro and Business Editions.
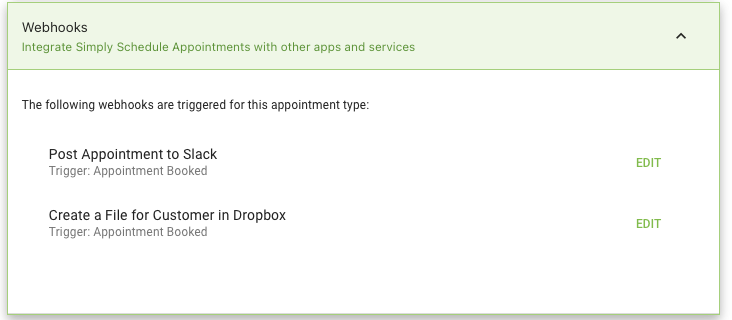
You’ll see a list of active triggers for sending the webhooks. You can use the Edit buttons on the far right to modify the settings for each trigger.
The possible integrations are endless. Zapier and Make can help you create connections to thousands of services and software that are part of your business flow.
Visit our guide on how to set up Webhooks.
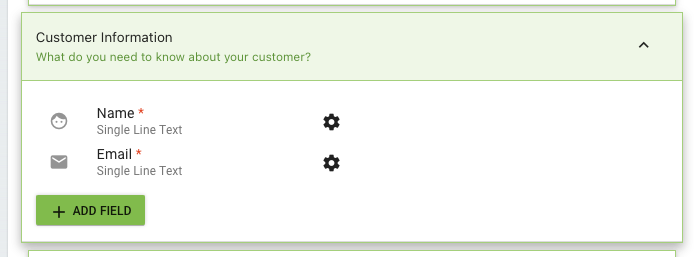
Customer Information
What do you need to know about your customers?
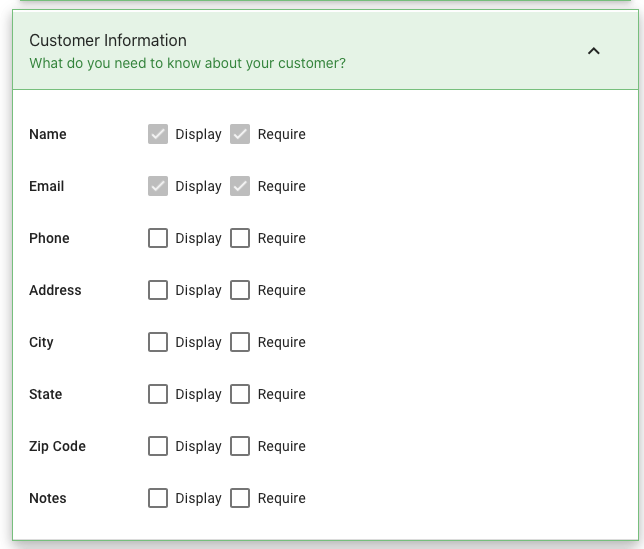
Check all the boxes for the fields you’d like to collect from your customers.
To show a field and have customers optionally fill it out, only tick the Display box.
To show a field and make it mandatory to fill out, tick both the Display and Require boxes.
Add Field
Available in the Plus, Pro, and Business Editions.
Add a custom text, checkbox, or radio field to the booking form. Learn more about how to add and edit custom fields in our Custom Fields guide.
Notifications
Options for sending customer and admin notifications.
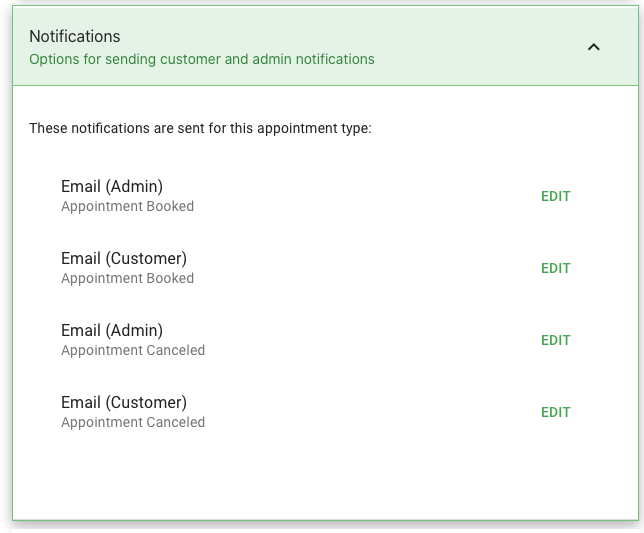
Visit the following guides to help you customize your notifications:
By default, email notifications are sent to both the admin and customers at the time of booking and cancellation.
Use the Edit buttons to jump directly into the notification editor to make changes.
And, if you need to create specific notifications, please feel free to take a look at this guide on tying notifications to appointment types.
Upgrade to the Business or Professional Edition to send out SMS using Twilio!
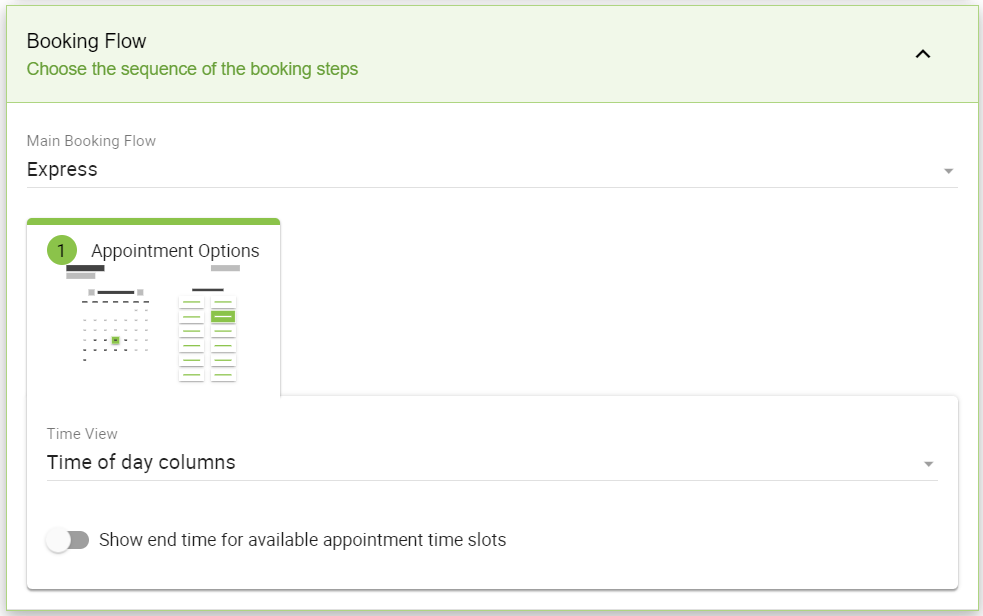
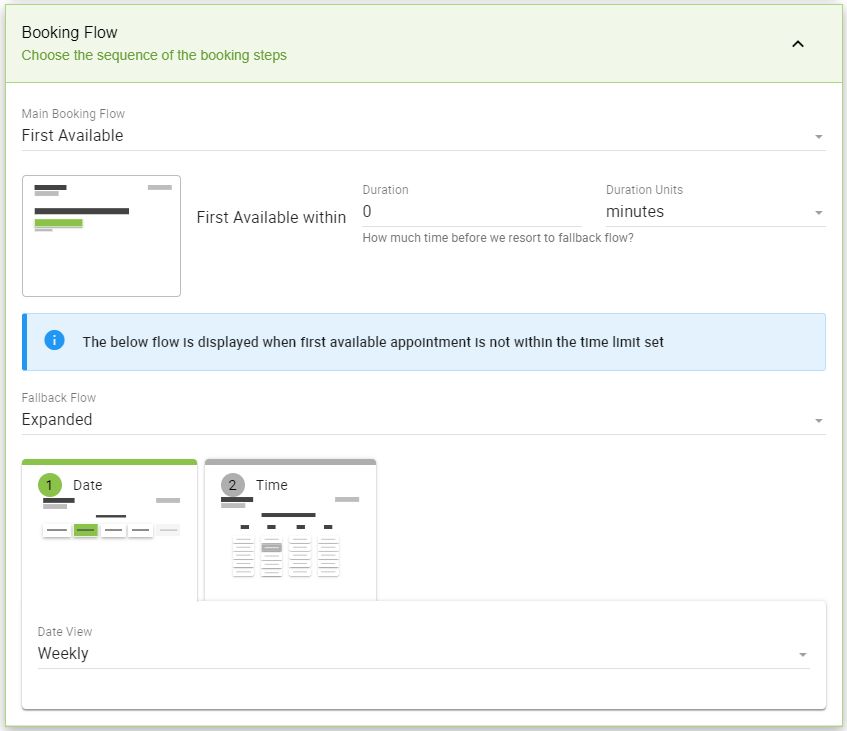
Booking Flow
Available in the Pro and Business Editions.
The Booking Flows feature allows each Appointment Type to have its own sequence of Views or screens for its booking form. Each View also comes with a few options to customize the layout of each screen.

Expanded
The Expanded Booking Flow shows the Date Selection screen followed by the Time selection screen before getting to the final customer information screen in the booking form.

Express
The Express Booking Flow consists of a single Appointment Options View containing the Date and Time selection on the same screen.
First Available
The First Available Booking Flow sequence begins by prompting the user to choose the First Available time slot within your pre-selected duration.
This Flow is also unique because it requires selecting a Fallback Flow. These are the booking steps that you’d like users to see if there is no time slot within the pre-selected duration for the First Available Flow.
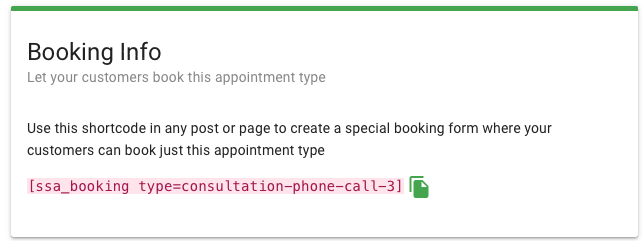
Booking Info
Let customers book this specific appointment type.
Finally! When you’re done making changes to the Appointment Type Settings, copy this shortcode to embed this specific Booking Calendar into your post or page.
Or, use the general [ssa_booking] shortcode to embed all your Appointment Type Calendars into a post or page.
Also, use your favorite page builder blocks to embed your Booking Calendar.
After tweaking your Appointment Type settings, learn how to display your booking calendar.
Related Guides
-

Advanced Scheduling Options
-
Independent Availability for Appointment Types
-
Searching, Filtering, and Viewing Bookings
-

Blackout Dates