In this document:
Introduction
You can give non-administrators access to the full Appointments Admin page using the Members plugin. Specifically set user permissions for employees to manage the admin page, such as:
- Their Appointment Type Availability
- Seeing the Appointments booked for the day
- Edit their Notifications
To fully set this up, make sure to:
- Install and Activate the Members plugin
- Setup or Edit a Role for your employees
- Assign the Role to the employee WordPress user
Download and Install the Members Plugin
As a first step, Install and Activate the Members plugin:
Choosing the Role to Edit Permissions
After activating, click on the Members tab from the left side of the Dashboard menu.
You’ll see a table showing all the different available roles on your site. The default ones that come with WordPress are Administrator, Author, Contributor, Editor, and Subscriber:

Each role offers different permissions to access different areas of your WordPress site. You can learn more about the default roles here.
To Edit one of the default roles, click on one of them. Or, if you want to create your own role with custom permissions, click on Add New in the top-left corner.
Setting the Role Permissions
In this example, let’s create a New Role to ONLY manage admin Appointments.
Click on Add New. Enter the Role name. And then, go through each tab to see which permissions you’d like to allow.
For the sake of this example, I will only give my Employee user access to the Appointments.
On the left-hand side, look for the Simply Schedule Appointments heading and click on it:
To give the user permission to a capability, click on the permission check box under the Grant column.
To restrict the user from a permission, click on the permission check box under the Deny column.
Click the Update button to save your changes:
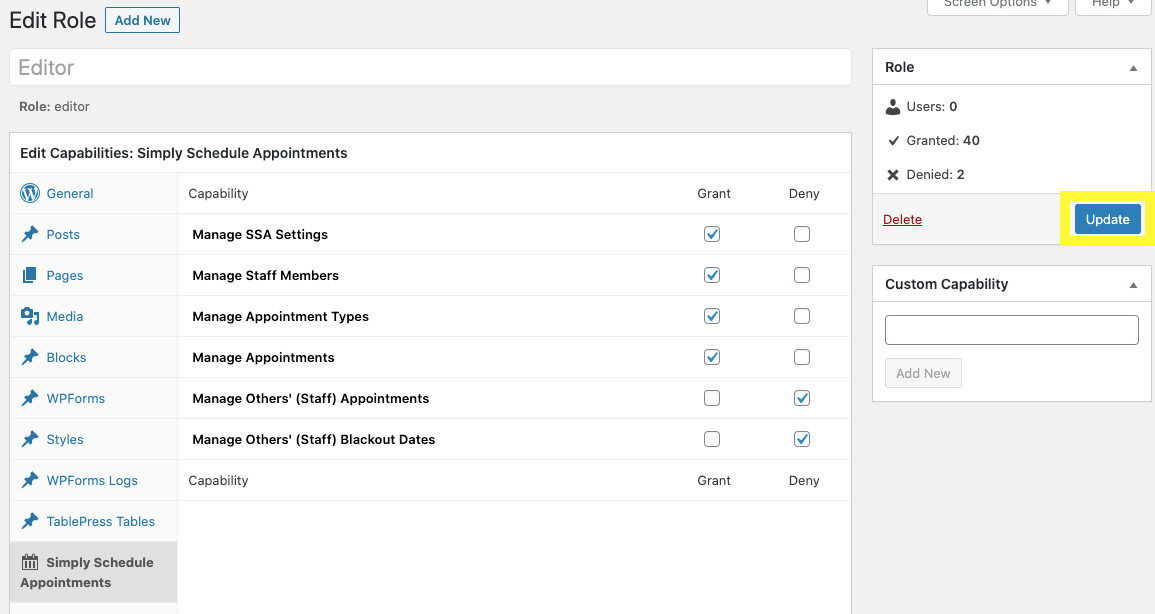
Role Capability Permissions, Manage Admin:
SSA Settings: Let the user access the Settings tab in the Appointments Admin Page.
Staff Members: Let the user manage staff members (coming soon, for Business edition)
Appointment Types: Let the user to add, edit, or delete Appointment Types.
Appointments: Let the user view upcoming appointments, past appointments and book a new appointment.
Others’ (Staff) Appointments: Let the user view upcoming appointments, and past appointments and book a new appointment on behalf of their staff members.
Others’ (Staff) Blackout Dates: Let the user create, edit, and delete blackout dates on behalf of their staff members.
NOTE! If you’re allowing employees to view appointments, you’ll need to grant BOTH “Appointments” and “Others’ (Staff) Appointments”. Or, else you will run into the error, “Please ask your administrator to link your account to an active team member.”
Assign a User to a Role
Once the role is created and the correct permissions assigned, the last step is to assign the role to your user(s). Or, you can create a new User.
Go to the WordPress Dashboard and click on Users in the left side menu.
To update a User’s role, hover over the User’s name, and an Edit button should appear. Open up the Edit Screen for your User and scroll all the way to the bottom.
Logging in as a New User
You can generate the password for your new User by editing their User profile.
Click on Edit by hovering over the User’s Name. Scroll all the way down to where it says Account Management. Click on the Generate Password button.
Your user will login the same way that you login as an admin. This is typically done at:
https://YOURWEBSITE.com/wp-admin
The /wp-admin page is the default login page for your WordPress website. And this usually remains that way unless you use a separate security plugin to change the location.
Test New User Account
Open a new private window, and in the search bar navigate to your WordPress website login page.
Type in the email/username and enter the password you just generated.
Related Guides
-

Searching, Filtering, and Viewing Bookings
-
Cancel, Reschedule, Edit or Delete Bookings
-
Viewing Team Bookings
-
Sync Multiple People’s Google Calendar Into One